My daughter's friend is having a baby shower and I was asked to make the centerpiece.
I LOVE going to baby showers and I loath ENJOY making diaper cakes as gifts.
A diaper cake is simply a layered cake made wholly with diapers. They are really easy to make but they are SO tedious!!! I had to break out the glue gun for this one and so it became dangerous too lol!!
I'll tell ya about that later hehehe!
I always have people asking me how to make one and so I have decided to share with you my step by step process so you can make your own. This post will be very picture heavy!!

Gather all of the following supplies:
84 Diapers (I used 2 brands...Luvs and Parent's Choice)
2" wide ribbon
3/4" wide ribbon
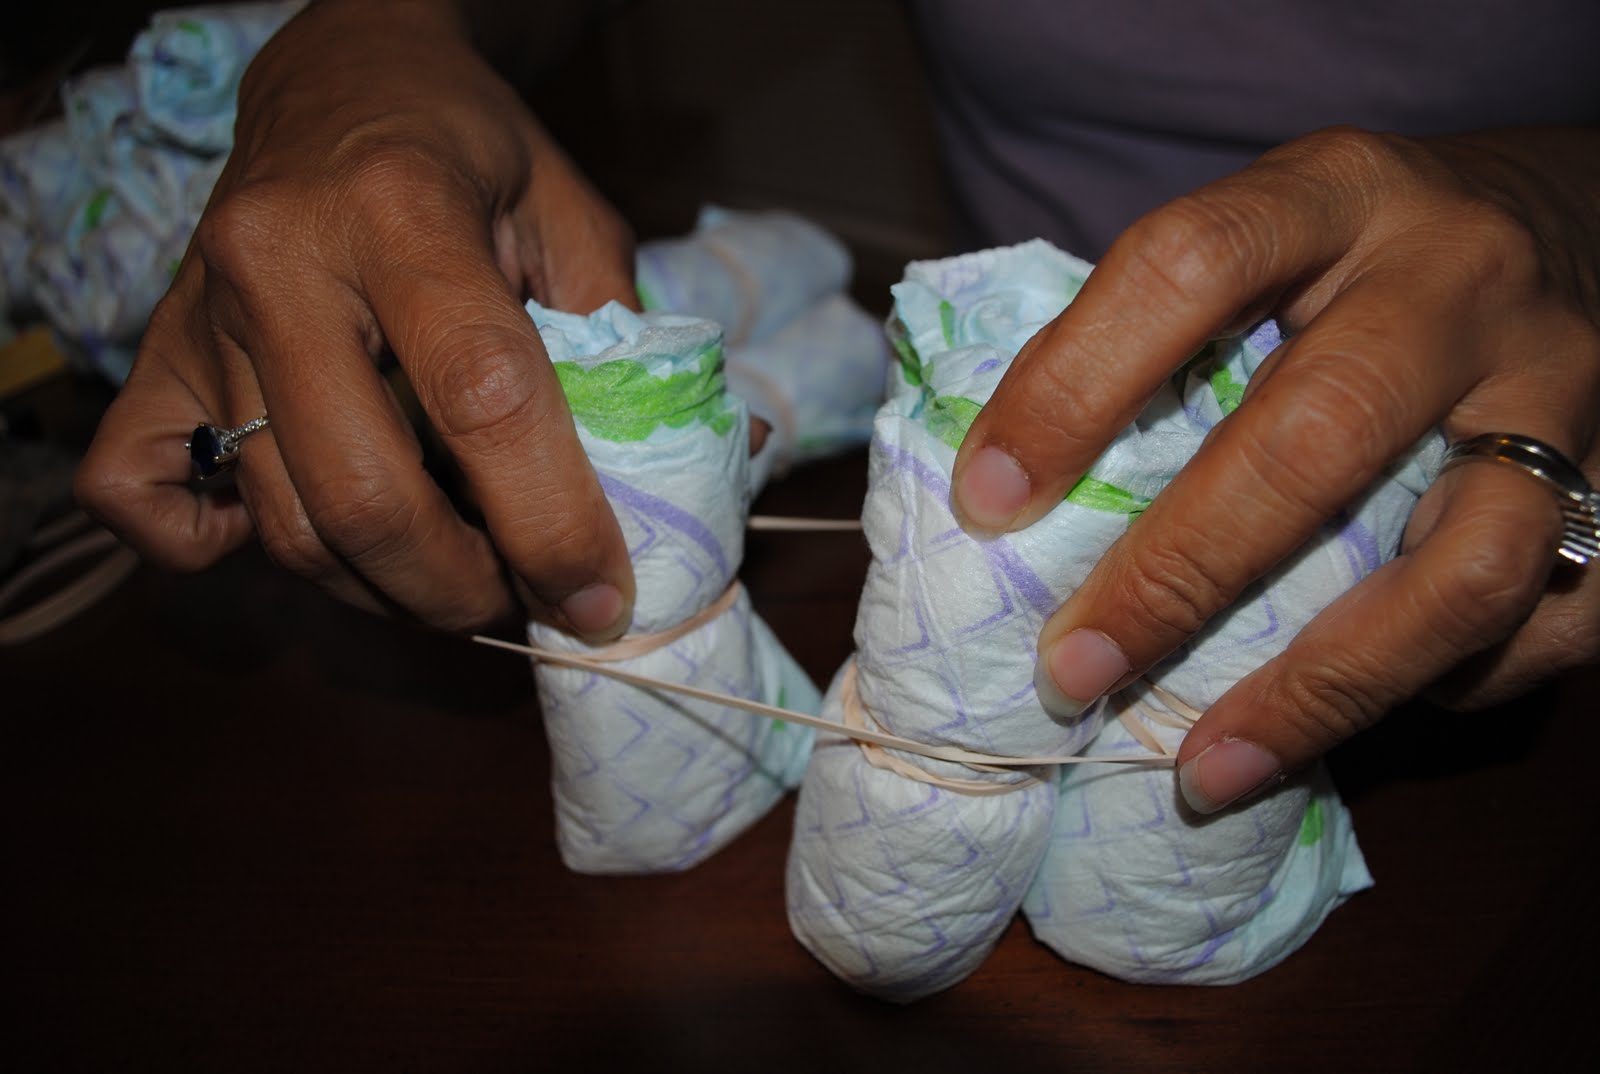
Rubber bands
Straight pins with ball tops
3/4" dowel rod
Johnson and Johnson travel pack
and choice of accessories
(I chose a monkey plush toy, an elephant bath mitt that I took back for a giraffe plush, and a pair of shoes)
Start by rolling each diaper into a tight bundle

Be sure that any image that may be on the diaper is rolled to the inside, then secure it with a rubber band.

Try to keep the rubber bands in the center and make certain that the bundle is nice and tight.

Once you have a good stack start forming your base. You will need to start with 4 diaper rolls. Secure the 4 rolls together with a single rubber band.

Now start adding bundles. To do this simply stretch the rubber band out enough to slip in the next bundle. Continue adding to the base until you have a large enough base. 
My first layer has 45 diapers and i only used one single rubber band to secure the entire base.

So, it has been awhile since I made one of these babies and well I forgot that brand name diapers have prints on them. I had to go back to Wal-Mart and exchange a pack for a non-printed diaper...
and I was not a happy camper but since I was going back, i also exchanged the elephant mitt for a cute giraffe.
You will need to make a second and third layer. My second layer had 28 diapers and the third has 11.
Stack the first and second layers on top of each other then enter the dowel rod into the center.

Before adding the 3rd layer, place a single diaper next to the dowel rod and cut the rod shorter than the diaper. The dowel rod is very important because it helps your layers stay stable.

You can either slide your third layer on the rod or build it around the rod. I do the latter.
Now the fun part---add the ribbon. The reason you had to keep the rubber bands in the center is so that you can hide them with the ribbon. I use the straight pins to secure the ribbon.

You can see the two pin heads sticking out the ribbon. This is VERY important so when mom wants to use the diapers, she can easily find the pins. I pull the ribbon tightly around the base layers and secure with at least 2 pins.

This ribbon looked fine all by itself but I always add a center ribbon so that I can easily add the accessories.

And now we can accessorize!!!!
I use straight pins to secure the plush animals to the diapers.

My little daughter was helping me and thought that it would be cute to put the shoes on the monkey. I agree!!! It looks so cute.
Now start adding the Johnson's travel pack items to the layers. I slip them in behind the narrow ribbon and they stay securely in place.

You have to hide the pin heads on the ribbon so use stickers or something cute. I used painted wood ornaments from michaels
I used the glue gun to attach the decals to the ribbon. I used hot melt glue....MISTAKE...and it got on my thumb!!!
OUCH!!
Now I have a pea sized blister on my thumb..waaaa waaa waaa!

Then fill in all the layers with paper shred!!!


VIOLA!
You are done!!! I like to place the cake on a round cardboard base and I add shreds to the bottom. If it's a gift, I wrap in cellophane but if it is the centerpiece, then I leave it as is.
Total cost for my cake:
84 Diapers........$12.71
2" wide ribbon....$1.97
3/4" wide ribbon.....$1.97
Rubber bands.....$.46
Straight pins with ball tops....$1.97
3/4" dowel rod.......$.40
Johnson and Johnson travel pack...$2.77
Monkey Plush..........$5.00
Giraffe plush........$6.00
Wood ornaments.......$.59 x 3
Baby's shoes.....$5.00
Total Cost......$40.02
This is a larger cake than I normally make but you can easily make a smaller cake with less diapers. Normally I would only use one bag of diapers and one plush animal but since this is for a very special person, I wanted her to have a special cake.
I normally have a spending limit for baby showers of 20 dollars and many times I have made these cakes forjust that. I didnt have time to go to Hobby Lobby for 50% off ribbon (shame on me) but I definitely recommend that. I also try to spend 4 bucks or less on the plush. If you did half the diapers cost would be as follows:
42 Diapers........$5.74
2" wide ribbon....$1.97
3/4" wide ribbon.....$1.97
Rubber bands.....$.46
Straight pins with ball tops....$1.97
3/4" dowel rod.......$.40
Johnson and Johnson travel pack...$2.77
Plush..........$4.00
Paper Shred.....$1.00
Total Cost......$20.28
(and if you bought 50% off ribbon it would be $18!!!)
If you have any questions, please feel free to email me!!
This post was a lifesaver! Thank you!
ReplyDeleteIf you were to make the smaller cake, how many diapers would be on each level? Thank so much for this!
ReplyDelete"I am very happy to read your articles it’s very useful for me,
ReplyDeleteand I am completely satisfied with your website.
All comments and articles are very useful and very good.
Your blog is very attention-grabbing. I am loving all of the in
turn you are sharing with each one!…
I know this post is a year and half old (hopefully you're still replying to comments!)... where on earth did you find diapers so cheap!?
ReplyDeleteSam