Tuesday, March 15, 2011

It's not just a chair...It's ART!

Well the "UGLY" chair has made it's transformation into a SWAN!
I sure had one heck of a time with this masterpiece!

I gathered all the supplies that I needed:
Electric sander (a must) and sandpaper (60 & 120 grit)
A scraper and painters mask
Screwdriver
I didnt look at the underside of the chair in the store....MISTAKE!
I was just so happy that I found the chair and after hubby's "ugly" comment, the chair was coming home!

Whoever put this thing together had no idea how to put fabric on a chair seat and oh what a mess!
The fabric was folded, tucked, stapled and glued to the seat!

WHAT WERE THEY DOING???
UGH!
I got the seat off and set it aside. Dealing with that mess was gonna have to WAIT!
I had a bigger mess to deal with on the chair!

I started sanding the chair with 60 grit sandpaper.
I thought about using a paint stripper but after reading the labels and the requirements for disposal I quickly opted for sanding!

60 grit was the best choice since it is so rough that it can remove wood!!!
But since there were globs and globs of paint...
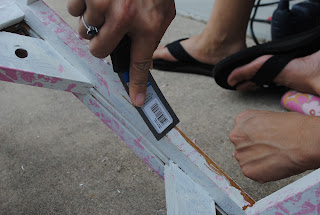
I was forced to scrape!


After 2 hours of some serious labor this is what the chair looked like:
I used the 120 finish sandpaper to smooth out the roughness from the 60 grit.
If you read my post about the photo/memo board I learned my lesson about primer!

I wanted you to see why primer is such an important thing:
If you look at the center piece you can see brown spots along the edges. It would literally take 3-4 coats of paint to cover this evenly!!!

I dont have patience for 3-4 coats so I primed!

I sprayed the chair with krylon spray paint (watermelon) after the chair was completely dry!
I was a really big idiot and I painted the chair inside my garage right before we were heading out to dinner. I closed the garage door, we got in the car and headed on our way. My OCD kicked in and I started worrying myself to death that the fumes were going to ignite and catch the house on fire!!! My wonderful hubby turned right around and we went back home to ventilate the garage!!
I LOVE THAT GUY!! :)


After dinner and with a well ventilated work area, I did the final touch ups.
Then onto the seat!
UGH!
Removing these staples was literally like pulling teeth WITHOUT novacaine!
There were 106 of these things and 4 layers of fabric!!!
WHAT WERE THEY THINKING?

I finally got them all off and got to work putting the new fabric on:
Once I stapled the fabric tightly in place. I reattached the seat and here is the finished chair:
It turned out PERFECT!
If you look closely under the chair you can see the pile of staples I had to remove...unbelievable!

This DIY project was easy to do but a little more work than I bargained for lol.
Let's break it down:
Chair...$8.99
Fabric....$2.44
Spray paint....$3.24
Primer...$3.97
Sandpaper...Free (i already had it)
Total Cost...$18.64

Not too bad. I was really hoping to find a chair at a garage sale for like $2 but it didnt happen.
Goodwill had the chair priced a little high in my opinion but it is a good cause.

I am much happier with the custom chair. I would have spent $20 at Ikea for a plain, boring chair.
Now I have a one of a kind work of art!

I linked up here:

Monday, March 14, 2011

My perfect day!

Goodwill, Family Thrift, lunch, and time with hubby and my Little Lexi!

This week is Spring Break in our city!
Our son is in Washington DC (lucky him) with his class trip, and our oldest is in New Mexico skiing with friends  (i'm jealous)!!

That means that Little Lexi is stuck at home with mom and dad!
Boring!
(NOT)
Eating out everyday, no chores, no fighting with brother and sister, this kiddo has it made!!

So the week started with the PERFECT day!
Or should i say ended? hmmm after all it was Sunday!

We have been doing lots of work in Lexi's room.
First the wild beautiful pink and grey walls.
Then the bedding to match.
Removed the cutesy name plaques we made a few years ago
(sad)
and then the Ikea desk for her sewing machine!
Yep my baby is learning how to sew!!!
Yippeee!!

So she needed a new chair
(ok, i wanted a new chair for her).
We packed in the car at 9:30 in the morning!!!
and by 2pm we found this:
When Lexi and I saw it, we both knew it was the one.

Hubby says:"that is one UGLY chair, there isn't paint in this world that will fix that mess!"
After all the years we have been married you would think that he would know better by now lol!

Stay tuned to see the transformation!!


Thursday, March 10, 2011

Shelicious Bling!!

I am SO excited to announce our newest sponsor!

Home of Unique and Stylish Bling for less Cha-Ching!

Shelicious Bling is the home of fun & fashionable jewelry frosting for less cha-ching! These ladies have some fabulous, one-of-a-kind finds that are sure to compliment your style.
On their site you will find many awesome hand crafted, unique items including Scrabble tile pendants, Bottle cap jewlery, Domino pendants, Bottle Cap belts, and a HUGE assortment of beaded necklace and earring sets.
This is just a small sample of the great things you will find
Head on over to their website at http://www.sheliciousbling.com/.
They also accept orders for custom jewelry!!! If you are looking for jewelry for bridal parties to coordinating team jewelry and pieces for that special outfit ...contact Shelicious Bling today! You may contact Sheila by email and be sure to let them know you saw them featured on this site.
If you are local to the Austin area, they can be found at many local artisan fairs as well.
They also do home parties and special event parties so definitely head on over to their website and browse their great deals. You can also find a calendar of all the events they will be featured at.

Sunday, March 6, 2011

Window Redo Complete

Earlier this week I set out on a MISSION to redo this mess!

I hated loved the curtains sooooo much and it was so upsetting to see them go (NOT!)
If you want to know more about my kitchen, I shared a story  here.

I had this stupid great idea to buy a window panel and make my own curtains.

The valances I wanted were $19.99 EACH and I needed two of them!
There was NO way I was spending 40 bucks on a set of valances.

After all.....I can sew!

WHAT was I thinking???

I had a fabulous idea to document my transformation of the panel into valances.
HA!
I cut the panel in half:

And didn't take a single other picture of the process!!!!
If you only knew the pain I went through!!!

The fruit of my labor is this:
I think they turned out pretty great despite the DRAMA I experienced making them lol!

I found a new home for hubby's root beer bottles and bought two super awesome smelling basil plants and pots.
Hobby Lobby had a WAY cool salt and pepper holder which I turned into my medicine holder!
and what you see is what I got!!!

Let's break it down:
Full size panel....$17.99
Basil plants (x2).....$6.66
Basil pots (x2).....$10.00
Medicine Holder.....$2.00
Napkin rings.....Free (already had them)
Cork Wreath.....Free (already had it)
Total....$36.65

Even though I faced some serious eyes bulging out of my head DRAMA with the valance I think it was worth it doing myself!

Here are my Lessons Learned:
1. If you are a novice at sewing, become familiar with the tension and stitch length settings BEFORE you sew lightweight, satin-like fabrics!!

2. Sometimes it's ok to spend $5 bucks on a pot when you find the perfect one! I am all for painting and decorating my own pots but these were too fab to pass up.

3. If you are going to turn panels into valances, make sure there are 2 panels in the package!!!! This is by far the most important lesson I learned. I had such a NIGHTMARE trying to match up the pockets and hems!!!