Friday, July 1, 2011

Dreaming a little dream about my crafty space

I love reading blogs and one of my favorites is http://www.lovestitched.com/. Brittany over at Love Stitched is having a linky party about what you Wish you could have, Want to have, and Dream about having. 

I have been wishing for a new craft space for months. I have a great space that is all mine but it is sooooooooooo messy and disorganized.
Creativity is messy and I am VERY creative but enough is enough!!!

I found this aweome design idea for a craft room over at a Whole Lotta Lovely
Isn't this FABULOUS?!!
I love everything Ikea and this whole room was done on an Ikea budget!! I wish I would have bought those legs on that table!!! They are awesome! This room is totally staged and not actually used but it would be so incredibly cool to have!!!

Thou shalt not covet one's craft room---but I sure do!!! Paisley Passion has it going on and you can read about her transformation here!
This is a REAL room!!! She is sooooooooooo Lucky!!! I love how she made the window seat with storage underneath it and I want this in my space!!! I have a window about this same length and could easily do something like this!!!

OMG!! bold, bold, and more bold!!
The use of color here is AMAZING!!! I can only dream of being so bold!! I just told hubby today that I wanted to paint my space orange and he did not like that idea too much. I guess we shall see!!

I am sitting here at my desk now with mounds stacks of neat piles waiting to have a new home. I am redoing this room darnit and I will do it CHEAPLY!!! I dont want to spend more than $150 and I want to use everything that is already existing in the room. I have high hopes  know....stay tuned.

Thursday, June 30, 2011

Sign Kit Assembly from As Unique As U

Please Excuse the Mess Sign kit
Thank you so much for your purchase.

Your kit will arive as follows:

Paint the board any color you like. I prefer to use a yard and garden paint or outdoor paints.
You can find 2oz outdoor paints at your local craft store for less than $2.00 or at Wal-Mart.
I usually paint all of the sides and the back of the board as well
Above, I laid a piece of parchment paper on the table to protect the table and simply squirted some paint directly onto it. You can use a foam brush to paint the board but I prefer brushes.
Let the paint dry completely!!! Do not attempt to place your decal on wet paint!!
Now prepare your decal

Lay the decal face down and peel the paper backing away from the decal. If the decal is a little stubborn just give it a firm press and then peel back and it should come off.
Remove the backing completely
Now position the decal onto the board. Do not apply any pressure.
Find the position that you like best. Once you decide on placement, smooth the surface with a card or hard spatula from the center out
It is ok to apply heavy pressure. Make certain that you rub across the entire decal.
Now slowly peel the transfer tape away from the decal until it is completely removed.
Determine where you want to place the screw eyelets for hanging. This step is not required. You can staple the ribbon to the back if you like, but I prefer the ribbon to be on top. I don't meaure when deciding where to place the eyelets but if you want to be exact you can measure 1" from each side and that will be a perfect distance. Screw in the eyelets on the top edge of the board then thread the ribbon through. Knot it once and Viola--done!


If using indoor acrylics, i do recommend that you use a sealer to protect the paint.

If you have any questions, please do not hesitate to email me. I would love to see your finished signs as well so also please email me a picture of it in use.

Thanks again for your purchase!!


Saturday, June 11, 2011

Baby Shower Diaper Cake

My daughter's friend is having a baby shower and I was asked to make the centerpiece.
I LOVE going to baby showers and I  loath ENJOY making diaper cakes as gifts.

A diaper cake is simply a layered cake made wholly with diapers. They are really easy to make but they are SO tedious!!! I had to break out the glue gun for this one and so it became dangerous too lol!!
I'll tell ya about that later hehehe!

I always have people asking me how to make one and so I have decided to share with you my step by step process so you can make your own. This post will be very picture heavy!!

Gather all of the following supplies:
84 Diapers (I used 2 brands...Luvs and Parent's Choice)
2" wide ribbon
3/4" wide ribbon
Rubber bands
Straight pins with ball tops
3/4" dowel rod
Johnson and Johnson travel pack
and choice of accessories
(I chose a monkey plush toy, an elephant bath mitt that I took back for a giraffe plush, and a pair of shoes)

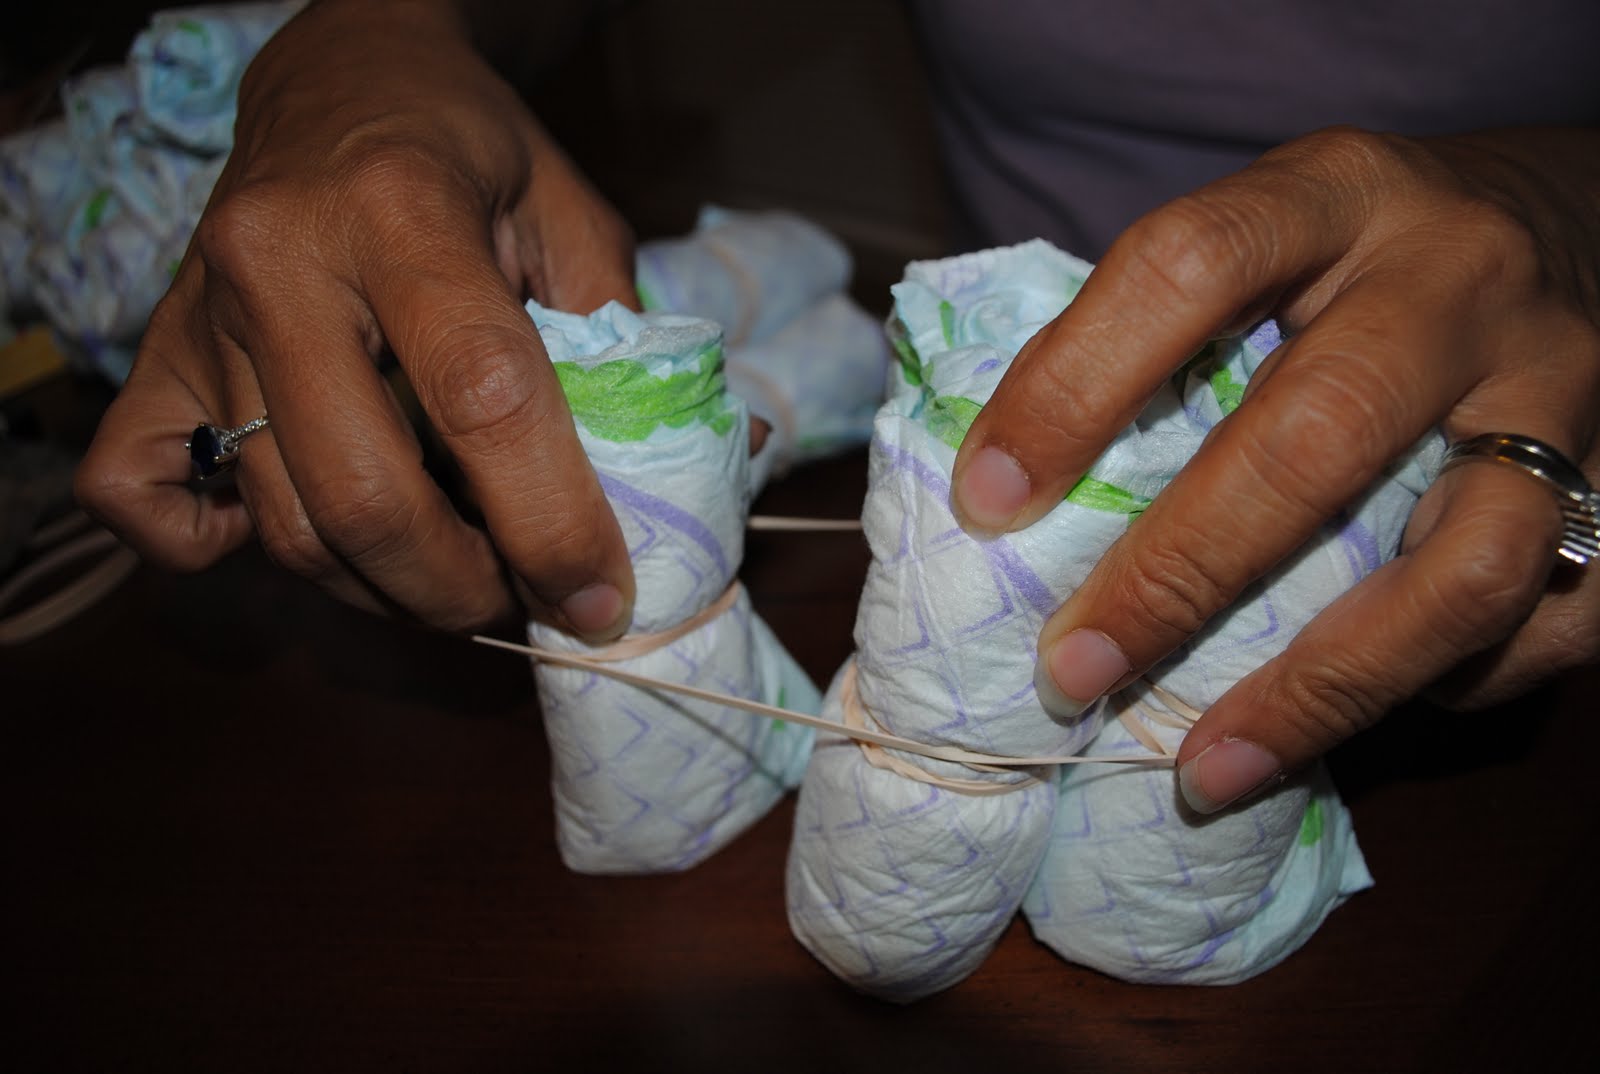
Start by rolling each diaper into a tight bundle
Be sure that any image that may be on the diaper is rolled to the inside, then secure it with a rubber band.

Try to keep the rubber bands in the center and make certain that the bundle is nice and tight.
Once you have a good stack start forming your base. You will need to start with 4 diaper rolls. Secure the 4 rolls together with a single rubber band.
Now start adding bundles. To do this simply stretch the rubber band out enough to slip in the next bundle. Continue adding to the base until you have a large enough base.
My first layer has 45 diapers and i only used one single rubber band to secure the entire base.

So, it has been awhile since I made one of these babies and well I forgot that brand name diapers have prints on them. I had to go back to Wal-Mart and exchange a pack for a non-printed diaper...
and I was not a happy camper but since I was going back, i also exchanged the elephant mitt for a cute giraffe.

You will need to make a second and third layer. My second layer had 28 diapers and the third has 11.
Stack the first and second layers on top of each other then enter the dowel rod into the center.
Before adding the 3rd layer, place a single diaper next to the dowel rod and cut the rod shorter than the diaper. The dowel rod is very important because it helps your layers stay stable.
You can either slide your third layer on the rod or build it around the rod. I do the latter.
Now the fun part---add the ribbon. The reason you had to keep the rubber bands in the center is so that you can hide them with the ribbon. I use the straight pins to secure the ribbon.

You can see the two pin heads sticking out the ribbon. This is VERY important so when mom wants to use the diapers, she can easily find the pins. I pull the ribbon tightly around the base layers and secure with at least 2 pins.
This ribbon looked fine all by itself but I always add a center ribbon so that I can easily add the accessories.
And now we can accessorize!!!!
I use straight pins to secure the plush animals to the diapers.

My little daughter was helping me and thought that it would be cute to put the shoes on the monkey. I agree!!! It looks so cute.
Now start adding the Johnson's travel pack items to the layers. I slip them in behind the narrow ribbon and they stay securely in place.
You have to hide the pin heads on the ribbon so use stickers or something cute. I used painted wood ornaments from michaels
I used the glue gun to attach the decals to the ribbon. I used hot melt glue....MISTAKE...and it got on my thumb!!!
OUCH!!
Now I have a pea sized blister on my thumb..waaaa waaa waaa!
Then fill in all the layers with paper shred!!!
VIOLA!
You are done!!! I like to place the cake on a round cardboard base and I add shreds to the bottom. If it's a gift, I wrap in cellophane but if it is the centerpiece, then I leave it as is.

Total cost for my cake:
84 Diapers........$12.71
2" wide ribbon....$1.97
3/4" wide ribbon.....$1.97
Rubber bands.....$.46
Straight pins with ball tops....$1.97
3/4" dowel rod.......$.40
Johnson and Johnson travel pack...$2.77
Monkey Plush..........$5.00
Giraffe plush........$6.00
Wood ornaments.......$.59 x 3
Baby's shoes.....$5.00
Total Cost......$40.02

This is a larger cake than I normally make but you can easily make a smaller cake with less diapers. Normally I would only use one bag of diapers and one plush animal but since this is for a very special person, I wanted her to have a special cake.

I normally have a spending limit for baby showers of 20 dollars and many times I have made these cakes forjust that. I didnt have time to go to Hobby Lobby for 50% off ribbon (shame on me) but I definitely recommend that. I also try to spend 4 bucks or less on the plush. If you did half the diapers cost would be as follows:
42 Diapers........$5.74
2" wide ribbon....$1.97
3/4" wide ribbon.....$1.97
Rubber bands.....$.46
Straight pins with ball tops....$1.97
3/4" dowel rod.......$.40
Johnson and Johnson travel pack...$2.77
Plush..........$4.00
Paper Shred.....$1.00
Total Cost......$20.28 
(and if you bought 50% off ribbon it would be $18!!!)

If you have any questions, please feel free to email me!!

Saturday, May 21, 2011

Stick Family Frame

I have been AWOL again. You just never realize how MUCH family life CONSUMES you until poof a month has gone by and NO post!
My son plays select baseball and the little princess plays soccer.
We have been sooooo busy with that!!
I also started selling my wood signs and tiles in a local boutique and keeping up with inventory has been a bit difficult...but fun!

Easter weekend was my niece's last weekend at home.
Military life has taken her to good 'ol Colorado.
Stephanie is a "Modern Mom"  and she wanted a cute and fun key holder.
I was at my sister's house AND she crafts too...yeah!!
so
we scoured her supplies and got to work.

I wish I had the before of the picture but it was UGLY! so no before :(
We painted the frame black and ironed the wrinkles out of the tissue paper.

We also took apart a bow that she had and replaced the animal print with pink.
I created the stick family with some cool software my sister has then cut the decal on her vinyl cutter.
I had to paint the backing of the frame white because the tissue was slightly transparent.
We simply glued it to the board, then I attached the decal to the glass.
Viola!
After putting the frame back together, we glued on the ribbon and added the hooks.
My niece LOVED it!
Ha Ha--it wasn't the best picture taking moment as you can see.
We were late for our own egg hunt lol and had to hurry and get the pic taken.


Monday, April 11, 2011

Ladder Display Shelf

Wow...how time FLYS!
I have neglected my blog for a few weeks due to a sad family situation.
All is getting back to normal now and my opening day is this friday so we had to get cracking!!

I decided to open a booth at a local gift shop called Gift of the Water in the Chupa Rosa Building in Georgetown.
I am soooooooooo EXCITED!

This shop is so fun and creative.
I just knew that I needed a unique display that will stand out in the crowd!

Time to put hubbys handy hands to work!!!
 I found this old wooden ladder on CraigsList. The guy wanted $40 bucks but that was my total budget for the project so I bargained him down to $30!!!
SCORE!

We headed to Home Depot and picked up wide and narrow fence boards.
Yep....fence boards.
 Hubby cut them 5', 4.5', 4', and 3.5' so that the shelves would make a trinagle shape.
Once he cut all of the boards, he got to work installing the anchors parallel to the steps.
Here he is....hard at work...he says "no pictures please"
hehehehehe, too bad I have the camera!
the shutter looking thing behind him is also part of my display. It is what I will hang my signs on.

Once the anchors were set, he put the shelves together. He had to put wood pieces on the bottom of the shelves to secure them together. Then we put them in place!

Viola!
I have since painted the entire thing antique white. I will post an updated pic of it as soon as I clear the shelves and prep it for set up.

The fence boards were actually $1.17 each and I needed 12 of them so I went a little over budget....sad....but the shelf turned out GREAT!

Here it is:
I didnt put the shelves on right so they look a little crooked but I assure you they are not.
The shutters will be behind it like shown

Let's Break it down:
Wooden Ladder.........$30.00
Fence boards..........$14.04
Nails and 1x1 board......Free (already had)
Paint..........Free (already had)
Total Cost.......$44.04

It was more than I wanted to spend but my alternative was Ikea shelves and I think these are much better than any Ikea shelf. I love when hubby helps me with these projects.

Tuesday, March 15, 2011

It's not just a chair...It's ART!

Well the "UGLY" chair has made it's transformation into a SWAN!
I sure had one heck of a time with this masterpiece!

I gathered all the supplies that I needed:
Electric sander (a must) and sandpaper (60 & 120 grit)
A scraper and painters mask
Screwdriver
I didnt look at the underside of the chair in the store....MISTAKE!
I was just so happy that I found the chair and after hubby's "ugly" comment, the chair was coming home!

Whoever put this thing together had no idea how to put fabric on a chair seat and oh what a mess!
The fabric was folded, tucked, stapled and glued to the seat!

WHAT WERE THEY DOING???
UGH!
I got the seat off and set it aside. Dealing with that mess was gonna have to WAIT!
I had a bigger mess to deal with on the chair!

I started sanding the chair with 60 grit sandpaper.
I thought about using a paint stripper but after reading the labels and the requirements for disposal I quickly opted for sanding!

60 grit was the best choice since it is so rough that it can remove wood!!!
But since there were globs and globs of paint...
I was forced to scrape!


After 2 hours of some serious labor this is what the chair looked like:
I used the 120 finish sandpaper to smooth out the roughness from the 60 grit.
If you read my post about the photo/memo board I learned my lesson about primer!

I wanted you to see why primer is such an important thing:
If you look at the center piece you can see brown spots along the edges. It would literally take 3-4 coats of paint to cover this evenly!!!

I dont have patience for 3-4 coats so I primed!

I sprayed the chair with krylon spray paint (watermelon) after the chair was completely dry!
I was a really big idiot and I painted the chair inside my garage right before we were heading out to dinner. I closed the garage door, we got in the car and headed on our way. My OCD kicked in and I started worrying myself to death that the fumes were going to ignite and catch the house on fire!!! My wonderful hubby turned right around and we went back home to ventilate the garage!!
I LOVE THAT GUY!! :)


After dinner and with a well ventilated work area, I did the final touch ups.
Then onto the seat!
UGH!
Removing these staples was literally like pulling teeth WITHOUT novacaine!
There were 106 of these things and 4 layers of fabric!!!
WHAT WERE THEY THINKING?

I finally got them all off and got to work putting the new fabric on:
Once I stapled the fabric tightly in place. I reattached the seat and here is the finished chair:
It turned out PERFECT!
If you look closely under the chair you can see the pile of staples I had to remove...unbelievable!

This DIY project was easy to do but a little more work than I bargained for lol.
Let's break it down:
Chair...$8.99
Fabric....$2.44
Spray paint....$3.24
Primer...$3.97
Sandpaper...Free (i already had it)
Total Cost...$18.64

Not too bad. I was really hoping to find a chair at a garage sale for like $2 but it didnt happen.
Goodwill had the chair priced a little high in my opinion but it is a good cause.

I am much happier with the custom chair. I would have spent $20 at Ikea for a plain, boring chair.
Now I have a one of a kind work of art!

I linked up here: