Saturday, January 28, 2012

We Met, We Married Subway sign

I have been working on bedroom decor signs for our master bedroom. I don't have a tutorial for you today---but---I had to share how this turned out. It looks fabulous!!

Subway art is quite the decor rage these days and I have to admit I am super addicted to creating it. I sell lots of different types of subway art in my Etsy shop and I make it as gifts as often as I can.

If you have a Cricut or Sihlouette machine you could easily cut the words out and line them up on the board. I used several different fonts in mine and kept the words and phrases specific to hubby and me.

I also made one for the Places we have lived

People always ask me "how did you do that?"
I use Microsoft Publisher A LOT! In fact, all of my design work is in Publisher.
Then I create a jpg image from the Publisher file, convert the image to a cut file and cut vinyl out using my plotter cutter.

Adhering vinyl is actually quite simple with transfer tape. Simply peel the paper backing from the back of the vinyl decal. Align the decal on the board, then press firmly with a straight edge. Peel off the transfer tape and viola--->finished sign.

I am working on our bedroom decor over the coming weeks so I hope to post the finished decor soon!

Wednesday, January 18, 2012

Valentine Wreath

I am addicted to Pinterest!!
I just can't get enough of it. Valentine's day is right around the bend and of course my mantle needed a Love makeover, so, I was searching for some great ideas to add to my Valentine decor.
I found a fabulous wreath over at the Idea Room and I knew I had to make it.

It was really easy to make but a bit time consuming!! I finished it while watching 2 of my favorite one-hour length shows!! Here goes:

I bought a heart foam form at Hobby Lobby for $2.47. I even paid full price---gah--- because my phone would not load the coupon fast enough and it was my turn in line.
I already had red fleece from a few Christmas projects that never got done and I decided to try to cut the circles with my sizzix machine. I have never cut anything but paper on the sizzix but I knew I needed a lot of circles so I gave it a shot AND IT WORKED!!

You will need:
heart foam form
red fleece or felt
push pins
scissors or die cutter

Cut circles out---a lot of them---I stopped counting after 75 and each circle was 2" in diameter. I am pretty sure I used at least 100 circles so cut,cut, cut away.
Fold the circle in half, then fold it in half again. Stick the push pin through the bottom corner and insert it into the foam.


You can see above that I inserted the folded circle flat into the foam and the head of the pin is showing. Simply turn the circle inward so that the head of the pin is facing away from you and fan the circle--like this:

Continue inserting folded circles into the foam.
It quickly begins to take shape. the back of the heart will remain flat. It will look like this when you are finished:

and here is a closeup

Once I was done, I added the heart to my mantle:
I just love it. I had been complaining about having too much red on the bottom half of the mantle and not enough on the top. well the heart helped to balance the color and now I love my valentine decor.
Here are a few closeups of my goodies:
 I love this ribbon garland. I bought it at Michael's with a 40% off coupon and cut it in half so that I could string a portion of it onto each candle holder.

 I am a sucker for all things crafty. The love sign was handcrafted by a local crafter and he did a fabulous job and the cupid cutie below was also done by a local crafter. She does some crazy cool things with clay!!

I hope you decide to try your own wreath. It was easy to make and it looks sooooo good.

Let's break it down:
Foam form ---> $2.47
Push Pins ----> $1.27
Fleece -----> I had it from another project but I originaly bought it as a remnant for $2.25
Total---> $5.99!!!


Sunday, January 1, 2012

2012 Goals & Committments


Welcome 2012!!
I can't believe another year has raced by. Time seems to be flying faster than I want it to but I am dealing with it in stride!! 2011 was a great year for me and my family--so much has happened and we have surely been blessed day after day, year after year!!

Many of my friends are posting resolutions on Facebook. I enjoy reading them for sure but I dont dare proclaim any myself for one simple reason:
I NEVER follow them through!!

So...If I never carry out a single resolution I make, why make them???
This year I am starting something new. Instead of resolutions, I am making a Goals & Committments list. I believe in goals and when I set them, I commit to finishing them, so, my hope is that with goals in place, I have a better chance at completing them.
1. Pay more attention to family- I think everyone has this as a goal but not everyone has the crazy busy life I do. I work full time outside of the home in a very demanding job and on top of that I have an online business which has been steadily growing into a busy, busy part time job. I also coach my daughter's volleyball team, am active in the school PTO, volunteer for my son's baseball boosters, and stay involved in the kids activities as much as I can. What I dont do is sit down and LISTEN to my kids. I am always so busy that I often forget to listen to what they have to say about what is important to them. My commitment this year is to spend more time listening to them!!

2. Lose 15 lbs- This is not your typical i need to lose weight resolution. I really need to drop 15lbs this year. I am a diabetic and weight control is very important. The more weight I lose, the more in control I am of my diabetes. I have lost 40lbs so far and the last 15 is the most difficult and requires the most commitment!
3. Learn new camera skills- I want to be a better photographer. I have a DSLR camera and have begun using it in manual mode. I would like to take a class this year and learn more skills and settings to improve the quality of my photos!
4. Take better care of my car- This may sound silly but my car quickly becomes a disaster area. I will devote one saturday a month to washing my car and cleaning the inside of it. I even have a plan to make a very snazzy car organizer for my daughter to keep all of her stuff that seems to be a necessity

5. Make better use of a calendar- enough said!

6. Create a date night plan with my husband- Hubby and I are always so busy with the kiddos that we never make time for each other. This year, I am planning one date night a month for he and I to go and do anything we want without the kiddos.

7. Create at least one blog post a month on this blog-I make so many things and yet I dont sit down and create the posts to share with all of you. Well with that snazzy new calendar system that I implement, I am going to make it happen. I will make at least one blog post a month and hopefully more but for now I want to commit to at least one---so---be ready for some cool projects including:
a. tablet hardcover case
b. valentine photo holder
c. laundry room drying rack
and more...

8. Organize my craft area more often-Creativity is messy indeed and this is why I plan on organizing the area once a week to keep it from getting in too much of a disarray.

9. Grow my online business- this is actually a lifelong goal. I have been working on this forever and I do plan on continuing but this year I have some big plans for my business and so I have to keep it on my list for sure!!

Wow! This is the quite the list!! I wish everyone a healthy, properous, and happy new year! I hope 2012 is the year of many new beginnings and continued success for everyone.


Friday, December 9, 2011

Christmas Mantle

I have been soooooooo busy that I have not had a chance to even think about posting on my little blog here!! It is definitely a good thing and I am so glad that my little business is doing so well.

I did manage to get a little Christmas decorating done. I have no step by step but I wanted to share our
Christmas Mantle


Every season I spend
 a bit of time to change out the decor!!
Christmas is my favorite season for decorating!!
I have NOT paid full price for anything you see in this picture!
Every single item was on clearance, something I made myself, or something hand
crafted that I bought at a
great price at local craft
fairs!!!

(above is my horrible attempt at writing in tree form lol---please ignore)

I have mentioned before that Hobby Lobby and Michael's have great after season clearance events. They will mark items down up to 80% after the holiday! I strongly recommend that you head there to pick up great stuff for your own home decorating needs!!

I am working on some cute felt crafts that I hope to share tutorials for soon. First I have to finish all of the holiday orders from my design shop and then a little family break.
Have a happy holiday season!

Sunday, October 16, 2011

Christmas tree decoration

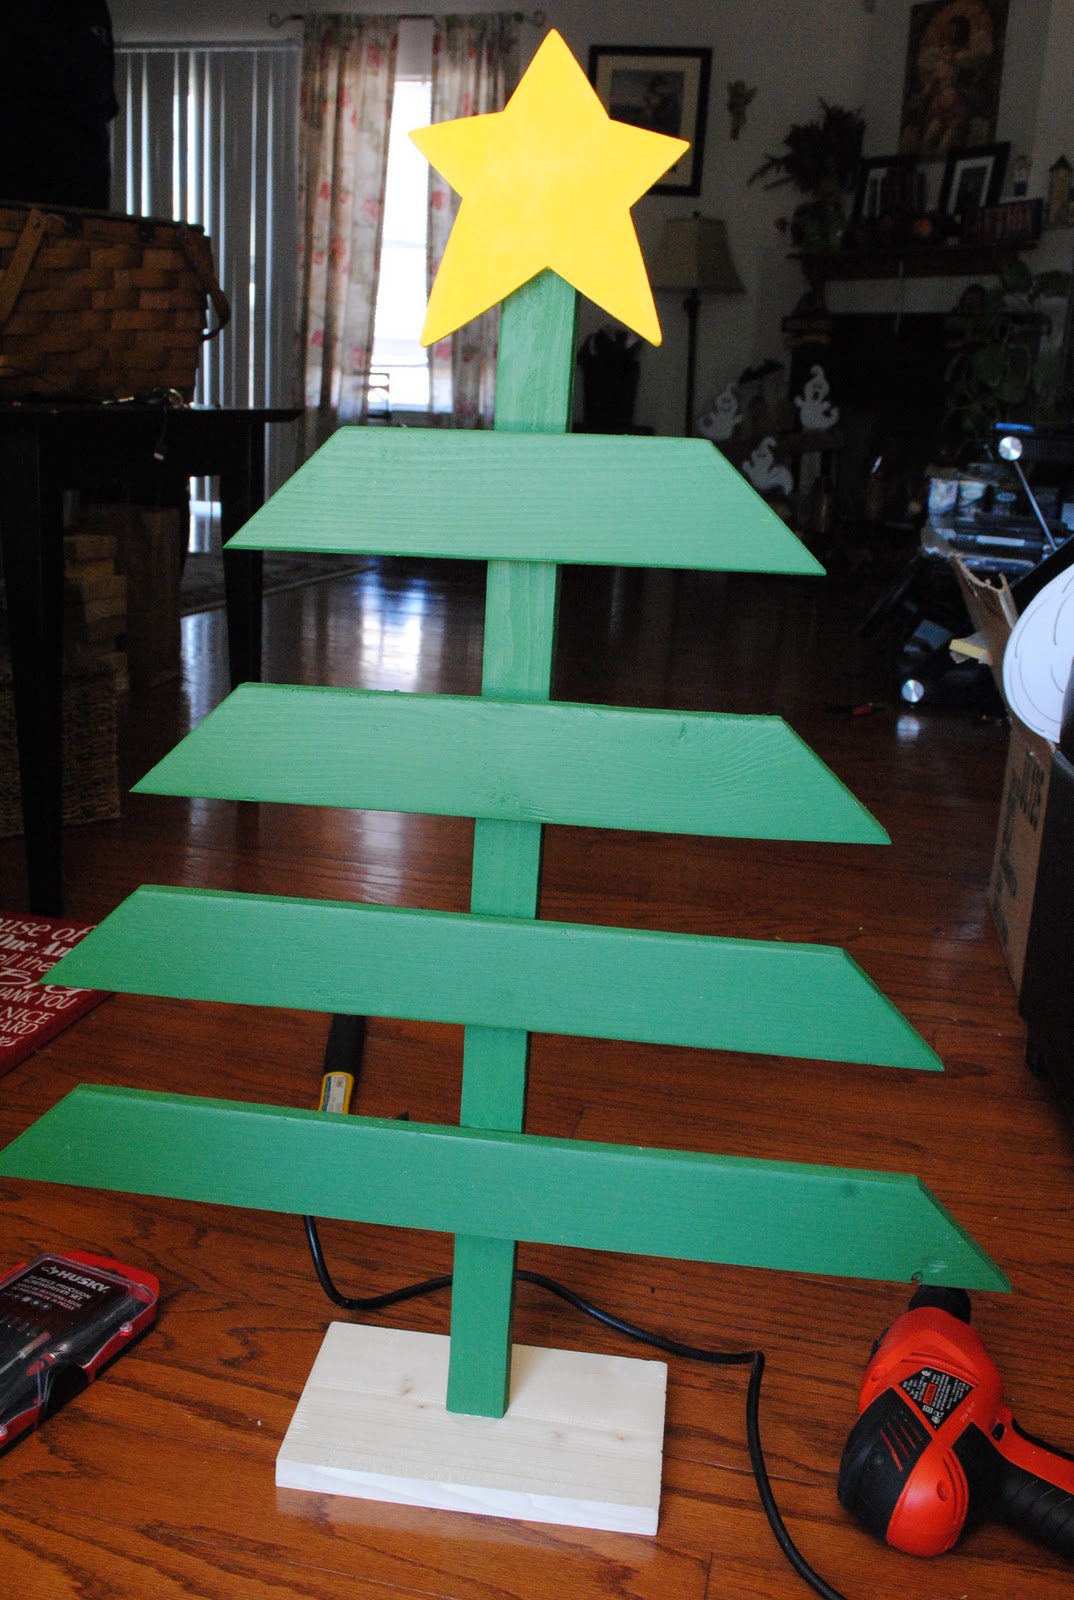
This weekend I was on a mission to make a unique earring holder for my upcoming craft show. What I ended up with is just toooo cute to use as an earring holder lol so now I have to figure out a plan B for that but I wanted to share with you how to make your very own super cute Christmas tree!

Supplies:
1- 1x3x8 board
1-1x2x6 board
1-scrap piece of wood for base
1 1/4" wood screws
1-star
green, yellow, and brown paint

This super cute tree was sooooo easy to make too!! Here we go....
Start by cutting your boards
I cut the following dimensions:
24", 20", 16", 12" and then helpful hubby cut the ends on a 45 degree angle. The 1x2 was actually a scrap piece of wood that we found in the cull lumber bin at Home Depot but it's dimension is 28". Cut the base of the tree also. We used a 1x6 scrap piece cut to 9" wide.

Sand the front piece of wood really well. The 1x3's at Home Depot are not the best cuts so they have rough sides. I used a 60grit sand paper to smooth out the front side. While we were making our weekly Home Depot stroll, we discovered a handy tool called a Planer!! this will definitely be a tool that makes its way into our garage in the future!!

Paint the wood:
I used martha stewart bonsai green

Now turn the "good" side so that it is facing downward

Arrange the boards the way you are going to want them to look. I screwed in the screw from the backside so it wouldnt show on the front. Use a nail to make a pilot hole then screw in the screw

for the star, I actually used a 1" nail because the star was a little thinner than my other boards. I also recommend that you put a dab of wood glue before you screw it in place. I forgot to do this on mine.
Now drill a screw into the base. To find the center, mark an x on your board. Simply use a pencil and draw a line from corner to corner. you will find a perfect center every time!! The screw will stick up from the other side--this is OK

Now twist your assembled tree onto the screw
Turn it until it is tight. I should have painted my base before I did this part but I forgot and so I had to paint it afterwards. I used brown.

Here is what you will have so far. Now you can add any words you want. I have a handy vinyl cutter so of course, I cut my own words out. If you dont have a vinyl cutter, you can simply write the words on with white paint.
I use transfer tape to apply my vinyl. I also ended up painting the stem of the tree "trunk" brown.
and viola you have a finished tree:
Let's break it down:
1x3x8---$1.64
1x2---$.51 (I got mine from scrap bin)
1x6---$.51 (also from scrap bin)
Star---$1.29
Paint----already had
Vinyl----cut myself
Screws---already had
Total---$3.95!!

Super cheap---Super easy----Super Cute!

If you are interested in making one and would like to purchase the vinyl decal, I do offer vinyl for sale--HERE!
 
Linking up to:
Made By You Mondays @ skip to my lou

Sunday, October 9, 2011

Fall decorating

I love Fall and Halloween!!!
I live in Texas so we dont really have a changing of the seasons, but when October comes it is time to "pretend" the season has changed and time for fall decorating.

I have a fireplace---not like we actually need it---but it is great for a decorating focal point!!
Here is a current shot of my mantle. I removed all of the sports stuff (except the mood doll since football is still happening and hubby updates his moods regularly depending on how his team performs)

I have been collecting items for my Fall decor for a few years so I went to the garage and took out the bucket. One by one, i set up all of the items---here is what it looks like now:

Last month, my hubby and i went to the Wimberley Market days and I picked up the super cute picket fence with ghosts
I added the little wood decoration that says Boo and viola finished piece.

I bought the scarecrows at Hobby Lobby at the end of last season--they were 80% off!!!! I highly recommend that you browse their season clearance items if you want to build your own decor collection.


I made the Caution sign myself and I have a few other signs that I plan on adding but for now, my fireplace transformation is complete.

Something really crazy happened to my candles this year. I have had these candles for at least 4 years, but this past summer the heat was brutal. I guess my garage got really hot and my candles literally melted together and impressions of other objects imbedded themselves into the soft candles---take a look:

I am still able to use them but I think I will have to replace them after this year---I hope Hobby Lobby has some left when the 80% clearance comes up again!!!

Monday, September 12, 2011

Christmas Clay Earrings

OMG! Aren't these the cutest little gingerbread earrings!!!
I was strolling through all of the Christmas stuff at Hobby Lobby---yes Christmas stuff lol---and I stumbled into the mini tree ornament aisle.

There were soooooooooooo many cute ornaments but I am not a "mini tree" kind of person. I noticed that the clay ornaments had little eyelets at the top and I immediately knew what I could do with them--EARRINGS!!

I bought these:
My youngest daughter loves cute earrings and with this little set she can have 12 unique pairs that I am sure NOONE else will have. The tree ornaments were 50% off---score! I bought 2 identical sets--a must have if you are making pairs, but I guess you could make mismatch sets just the same.

Remove the package overlay and reserve the plastic covering to use as a tray. Cut all of the strings off of the ornaments:
Make sure the eyelet is screwed in snuggly and it should be turned so that the hole is facing you.

Use your tweezers to open up the loop on the fishhook
It was really hard to get these pictures---sorry---but here is what it should look like when it is opened up:

Now insert the ornament into the opened loop--make sure his body is facing the right direction. his front part of his body should be facing opposite the fishhook.

Now close the loop.
That's it!!! I am a complete novice when it comes to jewelry making but these were super simple!!!
It took me all of 15 minutes to finish all 12 sets.

The best part is that each pair only cost $.37 each!!!!

Yep!!

Let's break it down:
Mini-Tree Ornaments ----$2.99 for both sets
(I got mine when they were 50% off at Hobby Lobby so it was like buy one get one free!! Normal price was $2.99 each)
Fish Hook earring finds---$1.50
(also 50% off at Hobby Lobby, normal price is $2.99)
Total---$4.49
I got 12 sets---so $.37 a pair!!!

There are sooooo many cute sets. The important thing is to make sure that the ornament has the little eyelet at the top. Hobby Lobby has stuff on sale all of the time and I only buy stuff when it is on sale. I checked at Michael's and they didnt have any clay ornaments like Hobby Lobby. Check your local craft store and see what you can find!!
Linking up to: