Friday, December 9, 2011

Christmas Mantle

I have been soooooooo busy that I have not had a chance to even think about posting on my little blog here!! It is definitely a good thing and I am so glad that my little business is doing so well.

I did manage to get a little Christmas decorating done. I have no step by step but I wanted to share our
Christmas Mantle


Every season I spend
 a bit of time to change out the decor!!
Christmas is my favorite season for decorating!!
I have NOT paid full price for anything you see in this picture!
Every single item was on clearance, something I made myself, or something hand
crafted that I bought at a
great price at local craft
fairs!!!

(above is my horrible attempt at writing in tree form lol---please ignore)

I have mentioned before that Hobby Lobby and Michael's have great after season clearance events. They will mark items down up to 80% after the holiday! I strongly recommend that you head there to pick up great stuff for your own home decorating needs!!

I am working on some cute felt crafts that I hope to share tutorials for soon. First I have to finish all of the holiday orders from my design shop and then a little family break.
Have a happy holiday season!

Sunday, October 16, 2011

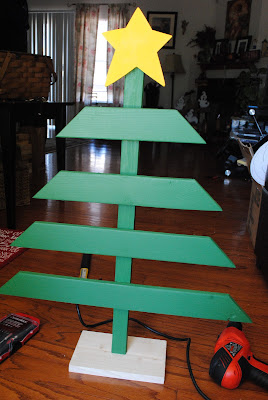
Christmas tree decoration

This weekend I was on a mission to make a unique earring holder for my upcoming craft show. What I ended up with is just toooo cute to use as an earring holder lol so now I have to figure out a plan B for that but I wanted to share with you how to make your very own super cute Christmas tree!

Supplies:
1- 1x3x8 board
1-1x2x6 board
1-scrap piece of wood for base
1 1/4" wood screws
1-star
green, yellow, and brown paint

This super cute tree was sooooo easy to make too!! Here we go....
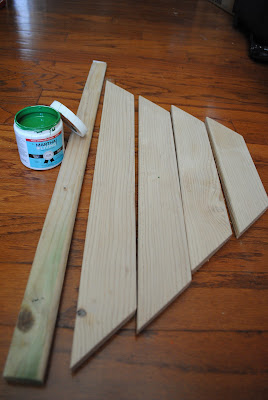
Start by cutting your boards
I cut the following dimensions:
24", 20", 16", 12" and then helpful hubby cut the ends on a 45 degree angle. The 1x2 was actually a scrap piece of wood that we found in the cull lumber bin at Home Depot but it's dimension is 28". Cut the base of the tree also. We used a 1x6 scrap piece cut to 9" wide.

Sand the front piece of wood really well. The 1x3's at Home Depot are not the best cuts so they have rough sides. I used a 60grit sand paper to smooth out the front side. While we were making our weekly Home Depot stroll, we discovered a handy tool called a Planer!! this will definitely be a tool that makes its way into our garage in the future!!

Paint the wood:
I used martha stewart bonsai green

Now turn the "good" side so that it is facing downward

Arrange the boards the way you are going to want them to look. I screwed in the screw from the backside so it wouldnt show on the front. Use a nail to make a pilot hole then screw in the screw

for the star, I actually used a 1" nail because the star was a little thinner than my other boards. I also recommend that you put a dab of wood glue before you screw it in place. I forgot to do this on mine.
Now drill a screw into the base. To find the center, mark an x on your board. Simply use a pencil and draw a line from corner to corner. you will find a perfect center every time!! The screw will stick up from the other side--this is OK

Now twist your assembled tree onto the screw
Turn it until it is tight. I should have painted my base before I did this part but I forgot and so I had to paint it afterwards. I used brown.

Here is what you will have so far. Now you can add any words you want. I have a handy vinyl cutter so of course, I cut my own words out. If you dont have a vinyl cutter, you can simply write the words on with white paint.
I use transfer tape to apply my vinyl. I also ended up painting the stem of the tree "trunk" brown.
and viola you have a finished tree:
Let's break it down:
1x3x8---$1.64
1x2---$.51 (I got mine from scrap bin)
1x6---$.51 (also from scrap bin)
Star---$1.29
Paint----already had
Vinyl----cut myself
Screws---already had
Total---$3.95!!

Super cheap---Super easy----Super Cute!

If you are interested in making one and would like to purchase the vinyl decal, I do offer vinyl for sale--HERE!
 
Linking up to:
Made By You Mondays @ skip to my lou

Sunday, October 9, 2011

Fall decorating

I love Fall and Halloween!!!
I live in Texas so we dont really have a changing of the seasons, but when October comes it is time to "pretend" the season has changed and time for fall decorating.

I have a fireplace---not like we actually need it---but it is great for a decorating focal point!!
Here is a current shot of my mantle. I removed all of the sports stuff (except the mood doll since football is still happening and hubby updates his moods regularly depending on how his team performs)

I have been collecting items for my Fall decor for a few years so I went to the garage and took out the bucket. One by one, i set up all of the items---here is what it looks like now:

Last month, my hubby and i went to the Wimberley Market days and I picked up the super cute picket fence with ghosts
I added the little wood decoration that says Boo and viola finished piece.

I bought the scarecrows at Hobby Lobby at the end of last season--they were 80% off!!!! I highly recommend that you browse their season clearance items if you want to build your own decor collection.


I made the Caution sign myself and I have a few other signs that I plan on adding but for now, my fireplace transformation is complete.

Something really crazy happened to my candles this year. I have had these candles for at least 4 years, but this past summer the heat was brutal. I guess my garage got really hot and my candles literally melted together and impressions of other objects imbedded themselves into the soft candles---take a look:

I am still able to use them but I think I will have to replace them after this year---I hope Hobby Lobby has some left when the 80% clearance comes up again!!!

Monday, September 12, 2011

Christmas Clay Earrings

OMG! Aren't these the cutest little gingerbread earrings!!!
I was strolling through all of the Christmas stuff at Hobby Lobby---yes Christmas stuff lol---and I stumbled into the mini tree ornament aisle.

There were soooooooooooo many cute ornaments but I am not a "mini tree" kind of person. I noticed that the clay ornaments had little eyelets at the top and I immediately knew what I could do with them--EARRINGS!!

I bought these:
My youngest daughter loves cute earrings and with this little set she can have 12 unique pairs that I am sure NOONE else will have. The tree ornaments were 50% off---score! I bought 2 identical sets--a must have if you are making pairs, but I guess you could make mismatch sets just the same.

Remove the package overlay and reserve the plastic covering to use as a tray. Cut all of the strings off of the ornaments:
Make sure the eyelet is screwed in snuggly and it should be turned so that the hole is facing you.

Use your tweezers to open up the loop on the fishhook
It was really hard to get these pictures---sorry---but here is what it should look like when it is opened up:

Now insert the ornament into the opened loop--make sure his body is facing the right direction. his front part of his body should be facing opposite the fishhook.

Now close the loop.
That's it!!! I am a complete novice when it comes to jewelry making but these were super simple!!!
It took me all of 15 minutes to finish all 12 sets.

The best part is that each pair only cost $.37 each!!!!

Yep!!

Let's break it down:
Mini-Tree Ornaments ----$2.99 for both sets
(I got mine when they were 50% off at Hobby Lobby so it was like buy one get one free!! Normal price was $2.99 each)
Fish Hook earring finds---$1.50
(also 50% off at Hobby Lobby, normal price is $2.99)
Total---$4.49
I got 12 sets---so $.37 a pair!!!

There are sooooo many cute sets. The important thing is to make sure that the ornament has the little eyelet at the top. Hobby Lobby has stuff on sale all of the time and I only buy stuff when it is on sale. I checked at Michael's and they didnt have any clay ornaments like Hobby Lobby. Check your local craft store and see what you can find!!
Linking up to:

Thursday, September 8, 2011

Message Center is Finished!!

I finally finished the Message Center Chalkboard!!!
I found the hook and the chalk holder at Hobby Lobby for 50% off--YEAH!!

Each piece was only 2.99 and at 50% off it was like buy one get one free!!!
You can read about how I made the chalkboard message center here.

I LOVE how it turned out!

I am linking up at:

Friday, August 19, 2011

Family Vacation!

As a kid we rarely, if ever, went on a family vacation. I have memories of a couple of trips to the beach in Corpus Christi and AstroWorld in Houston.
My parents divorced when I was 9 and my dad was an "older" parent (he had me at 50 and my little brother at 54) so we really didn't go to many places.

I decided that when I had children I would make it a point to go on a yearly family vacation and I have worked really hard to make it happen. Some of  our trips have included: Macy's Thanksgiving Parade, DisneyWorld, Branson, Boston, Maine, and so much more.

We have 3 kids!!! So, taking vacations like these requires one thing----PLANNING!!

When I created this blog, I thought I would only showcase all things crafty that I love doing so much, but my girlfriends tell me all the time that I need to showcase so much more---so---here is the first attempt at doing so!!

Boston on a Budget!!!
Isn't this one spectacular view!!!
uh huh--it is and we got to see it from aboard a Whale Watching boat excursion on our way out to sea.

We didn't see one whale, not even two---we saw FIFTEEN!!!
I can't even begin to tell you how amazing it was.

And with the Go Boston card, we didn't have to pay anything extra to include this outing on our list of to do's! We paid one low price for the card and it included so many attractions that we had a hard time choosing what we wanted to do.

You can tour Fenway park, sail on a schooner, ride the swan boats in the park, get discounts in quincy market, go to the aquarium, ride a trolley and take a tour of the city and sooooo much more!!

We only had two days in Boston on this visit because we headed to coastal Maine for the rest of the visit and gah,
I wish we had more time.

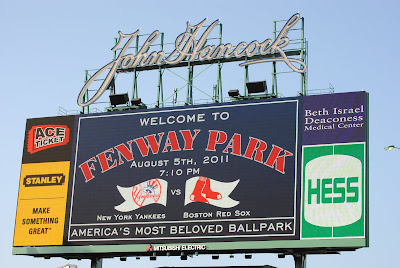
We were lucky enough to have tickets to a Yankees -v- Red Sox game!!!
Most people would think that we paid a fortune pretty penny for these tickets---but---We didn't!!!
We found a great Memorial Day deal for tickets on the Red Sox website.
Now, we had to buy tickets for 2 games and we didnt even go to the first game--but--we paid half the price we would have on stub hub!!!
SCORE!

We saw an Imax movie, went to the Aquarium, rode the Trolley and took a tour of historical Boston, ate great food, and enjoyed hours of entertainment in Quincy Market.
AND
We did it CHEAP!!
Check out the Go Boston Card--Here!
We bought a 2-day card for $74.99 (adults) $54.99 (child) and we will definitely do it again!
Boston was a city that we sure did not get enough of and the memories will last a lifetime!!
We got our money's worth out of that card for sure!!

Normal Prices:
Whale Watch-Adult $39.95, Child $31.95
Beantown Trolley-Adult $42, Child $16
Aquarium-Adult $22.95, Child $15.95

We also took advantage of the discounted Imax and merchandise in Quincy Market. We only had time to do these three things since we had a Red Sox game on the agenda but wowy it was worth it. We boarded the Trolley near the aquarium and we stayed on it for the whole tour.

We did hear people complaining that they waited for a long time for the next trolley so I am glad we didnt get off. I would recommend riding the trolley for an entire trip and then use the subway or T train system to get you to the destinations you want to go to. It is safe and easy to use.


Saturday, August 13, 2011

Message Center Chalkboard

So I have become overly OBSESSED with cabinet doors.
I can't get enough of them!!!

On a recent shopping trip to Ikea
---the best store in the whole wide world---
I found this beauty in the clearance area!
For $3.99 this baby was a STEAL!!!

I knew exactly what I wanted to do with it!!! I primed it first to avoid any paint adhering issues.

As you can see, I am stingy with my primer lol!
At 3.34 a can, you have to try to stretch it out for as many projects as possible, so use it sparingly.
The purpose of the prime is simply to give a dull enough surface for paint to adhere. You could sand it but that is wayyyyy too much work for me, so I prime!

Picking the right paint was super simple!! I wanted a bold red! I chose Martha Stewart LadyBug and picked up a tintable tester at Home Depot!
$2.94
  
Chalkboard paint is the next best thing to sliced bread lol. I found this great bottle at Hobby Lobby for $3.99. I will have lots of great projects from this little bottle!!
I taped newspaper on the center of the cabinet door then painted the frame red. When it was completely dry, I removed the newspaper and painted the center.

When using chalkboard paint, you have to paint in one direction, let dry, then paint another layer in the opposite direction. It was super easy and dried really fast!!
I cut out the Message Center decal myself then adhered it to the top of the frame.
I sanded the edges to reveal some of the original black paint and white primer. 

I think it looks fabulous!!

Let's Break it down:
Cabinet Door.....$3.99
Chalkboard paint.....$3.99
MS red paint.....$2.94
Decal.....$Free (I made it myself)
Primer....$Free (already had from other projects)
Total Cost---$10.92

I have so much paint left over!! I know I will use the paint on other projects. I have seen these chalkboard message centers in stores for more than $30---so---I don't mind having all of the extra paint for lots of other goodies!!!

Sunday, July 31, 2011

Are you Ready for some football??!!!

Football is here!!!

Football is here!!!
wait....
Football is here!!!!!

All year long, my husband has been moping around, waiting, wondering is football going to happen this year?
It is a way of life for him and well it becomes a way of life for us too---thank goodness I don't mind.

I love to decorate the fireplace for the holidays!!!
Since we have months (waaaa waaa waaa) before the holiday season officially kicks off, I am decorating the fireplace for football!!!

We have a true house divided situation----I am a Redskins fan and he is a Patriots fan!!!
I have been buying stuff for his team first since his birthday is around the corner. Here is what I have so far:
This is a SUPER cool mosaic that I purchased from a local artist. I don't have any contact info for her but she does fabulous work. I even bought one for of my college mascot!!

Every football family needs a mood doll!!!
This super cute mood doll is only about 7" tall but sends a very definitive message about how he feels after a game lol.
It has 4 discs with different expressions on each. I bought this on Etsy here!

I found this great magazine cover on ebay some time ago and had it framed. I havent figured out how I am going to put it on the mantle yet but It will find a home there!!!

OMG!!! I totally LOVE this!! I custom ordered this from Simply Sugar Designs and she did a FABULOUS job. The color doesnt show too well in this picture but it is Patriots blue. She hand painted this beauty. It was supposed to be for hubby's birthday but I loved it so much that I could not wait to give it to him.

We are going to Boston on Thursday so I plan on picking up some additional gear there. I will be working on the fireplace display over the next few days and will post the finished look!!!

Saturday, July 23, 2011

Shelicious Bling

I began selling my crafts at craft shows in May 2010. I have met some great people at these events and I have decided that it is time to feature some of them on my blog. Each of the individuals I meet have great stuff and are hard working folks just like me. Today I am featuring Shelicious Bling. They are fabulous ladies and I hope you enjoy learning a little about them and then head on over to their website to find some great buys.
Shelicious Bling!
Shelicious Bling is the home of fun, fashionable jewelry frosting for less cha-ching! These ladies have some fabulous, one-of-a-kind finds that are sure to compliment your style. I have had the pleasure of working side by side with these ladies at craft shows and I am happy to share this great find with you.

SB was founded in March 2009 by two friends that realized they shared the same passion for fun, fashionable & affordable jewelry. They provide customers like you the “frosting” to compliment your outfit. The jewelry designs are versatile for women of all ages and each piece is created to add just the right amount of “flash” to any outfit whether you are at work or out on the town.


They provide you with a unique product at a very affordable price. You will find all sorts of items including Bottlecap & Scrapbook Tile jewelry, Domino pendants, Charm bracelets, Funky Fashionable bracelets & necklaces, Earrings, Chunky Jewelry, and of course Bling!Bling! There are so many fabulous items and the prices are AMAZING!!


They also accept orders for custom jewelry!!! If you are looking for jewelry for bridal parties to coordinating team jewelry and pieces for that special outfit ...contact Shelicious Bling today! You may contact Sheila or Anna, and be sure to let them know you saw them featured on this site.

They also do home parties and special event parties so definitely head on over to their website and browse their great deals. You can also find a calendar of all the events they will be featured at.

Saturday, July 9, 2011

Wedding decorations on a budget

One of my bestest friends in the whole world is getting married!!!!
I am so shocked happy for her!! hehehehe
I NEVER thought she would ever get married!!!!
but
SHE IS!!!

She did not want to have a big extravagant wedding. She asked ME to make the table decoratios for her on the cheapest budget I could possibly do it and still keep it somewhat nice.

I headed to dollar tree and bought some cute square candle vases, added a monogram and ribbon and here is what I have so far:
Aren't these the cutest!!!

I bought 16 of them, cut the monograms myself, and used 1 spool of ribbon.
Total cost for them so far $17.00!!!!

I added their names to the opposite side, put some white rocks on the bottom and a pink candle that I found at Ikea. I will finish them off with some white flowers around the candle. Very simple and I think they look great.

I stuck with the monogram theme and put the same mono on white pillars. Her colors are teal and pink so I just used those colors on the candles. I added the black ribbon because it looked way too unfinished. I think she will love them. These will go on the center of the table with 6 votives surrounding them and the squares will go on each end of the table. I will post pics of the finished table after this weekend.

Monday, July 4, 2011

Craft Room Redo

WOW!! What a weekend this has been!!!
After posting all that I wish, dream and want for my craft space, I decided it was time to make some of it reality!!!

Off to Home Depot we went....on the ride over, the first thing hubby says "no orange and no yellow"
WHAT!!!
did he read my posts on facebook or here?
Well, I wasn't giving up that easy lol!!

We picked the paint---finally---and home I go to start some prepping!!

I forgot to take a pic of the "true" before so this is the sort of before. the layout was pretty much what you see here with one exception---the table actually faced the wall. I turned it to see if I would like how it looked. The piles are what I moved out of the way so I could get ready for painting hehehe.
When I was standing back looking at this mess---i thought first "i have too much crap" and second "what have I started?" lol

I cleared the area and started painting---read for the color hehehehe
Citrus Punch---a combination of Orange and Yellow!! heheheheheheehe
This picture doesnt do enough justice for the color!!
Hours later and after two full coats it was time for a break!

Off to Goodwill, Dollar Tree, Big Lots, and the grocery store lol. I wanted to find a new lamp base and paint storage solution.


I found a simple lamp shade, a spice rack, sheer pink curtains, and a memo board.
Here is what I did to the spice rack:
After priming and painting, I hung it on the wall and organized my paints. This bad boy holds 66 bottles of 2 oz paint!!!

Time to put things back into place:

I ended up making a craft corner. I love it!! It is not the glamour fabulous that was in the inspiration rooms but considering I spent almost no money---it is super fabulous for me.

My computer desk is in perfect proximity to the craft area. I have a few more projects to do before it is completely finished but this is what I have done so far!!

Let's Break it Down:
Paint (citrus punch)---$26.22
Lamp base----$5.99
Lamp Shade----$2.99
Memo board----$1.99
Spice Rack----$3.99
Spray paint (watermelon)----$3.22
Primer----$free already had
Sheer Curtains---returned they were not right for my room lol
Total----$44.40!!!!

My budget is $150 bucks so I still have plenty to spend to make this space a little more functional. I am really loving this space. I still need to buy a curtain for the closet, a new trash can that is more stylish, need to redo the lamp base and get rid of that copper, and I am not liking what I did with the lamp shade so probably going to change that too. I am glad I tackled this space this weekend and I feel so much better working in this room!!!